Introduction – Data Validation

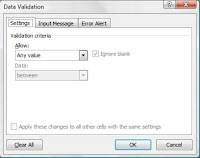
Data Validation Dialog Box
The following is a picture of a Data Validation dialog box.

Values can be set to allow:
Any Value
Whole Number
Decimal
List
Date
Time
Text Length
Custom
The Data can then be set to be:
Between
Not Between
Equal To
Not Equal To
Greater Than
Less Than
Greater Than or Equal To
Less Than or Equal To
Once you have set the previous criteria, you have to set the Minimum and Maximum amounts. For this, you can either select a range of data within your worksheet, or you can simply input numbers [select a list of data for the List option; select a start and end date for the Date and Time options; select a formula for the Custom option].
List Data Validation


Once the settings for your Data Validation have been set, you are able to set any input messages and/or error alerts.
Input Message
An input message is a message that appears when a cell is selected. This message is optional, but strongly advised if your workbook will be used by more than one person.
You can write a message that allows the user to see the valid inputs, or valid input requirements, before they enter a value. The following is an example of an Input Message being shown on our Excel project.
Title: Positive Dollar Value
Input Message: Enter cash shortages as a negative number.
We have chosen to put an Input Message on this cell to clarify to the user of this Bonus Calculator that the value in B9 must be a negative number.
Error Alert
Conclusion
To verify if your Data Validation has worked, try entering an "invalid" value. Excel will stop or warn you if you have properly set up a Data Validation.
If you would like to look at our project that has many examples of what we have talked about so far, please click here. (The file is an Excel 2007 document).
We hope this blog has informed you on how to use Data Validation with Microsoft Excel 2007. Thank you for viewing our blog.


